Color Check Action
The Color Check step type enables Rapta Supercoach to verify that colored objects are present and appear in the correct order during production. This feature is useful for inspecting wires, labels, indicators, clips, connectors, or other color-coded components where the order and separation of colors matter.
Color Check uses the platform camera to capture a reference image, lets a supervisor select each expected colored object and define the required order, and then compares live production images against the trained color sequence.
How It Works
Color Check uses intelligent color detection to identify assembly parts during coaching and verify their order. A Color Check step passes when all expected colors are detected in the correct order. If Check Overlap is enabled for the step, Rapta Supercoach will only pass the step when detected overlap between colored objects is within the allowed threshold.
Creating a Color Check Step
Selecting Color Objects
Color Check supports two selection modes:
Multi-click
Click on the color object to help the system develop a selection mask for the object. Continue adding click points until the entire object is selected. This is useful for irregular shapes or when you want the mask to follow the visible color more closely.
Bounding Box
Draw a box around the object. This is useful for simple shapes or when the object is easy to isolate.
After Selecting an Object
- Rapta Supercoach will automatically generate a color label for the objects based on detected color. Confirm or edit this label as needed before adding the object to the step. Click ADD to include the object in the step.
- Repeat for each expected color object.
- Use the edit or delete controls if a label or selection needs to be changed.
- Click on an object in the SELECTED OBJECTS list to see the bounds of its selection in the reference image.
- Click NEXT when all required color objects have been added.
You must add at least one colored object before continuing.
Confirming the Color Check Step
After colored object selection, the supervisor is directed to the confirmation page. Here they can:
- Review each selected color object
- Reorder colors using the move controls
- Edit object labels
- Adjust the color variance for each object. Color variance is discussed in greater detail below.
- Click TEST to preview the current detection for each colored object
- Enable Check Overlap if colors must not overlap
- Adjust the Allowed Overlap threshold.
- Update the step description and benchmark time
When the configuration looks correct, click FINISH to save the new Color Check step.
Color Variance and Tuning
Color Check uses the profile of the colored object that was selected during training to make detections of objects during coaching. The Color variance setting allows the user to tune the tolerance used to compare objects during coaching to this trained color profile. Higher values will make the detections more permissive, while lower settings will make them more strict.
Start with the default tolerance and use TEST to preview the result. You will see the trained selection boundary in gray and a dashed colored line representing the live detection made by the Color Check algorithm. If the live detection is not the same size as the gray selection boundary, adjust the color variance value and re-TEST. Increasing the color variance generally increases the size of the live detection bounds and decreasing will generally reduce its size.
Editing a Color Check Step
Color Check steps can be edited from the assembly edit page.
Use the step card’s Edit button to:
- Adjust color labels
- Reorder expected colors
- Change color tolerance
- Enable or disable overlap checking
- Change the allowed overlap threshold
- Recapture the reference image
- Reselect color objects
When editing an existing step, click SAVE to apply the changes. Clicking BACK will navigate to the Assembly Edit page without saving any changes made.
Coaching a Color Check Step
During coaching, the Color Check step will:
- Show the trained reference image with the expected color selections.
- Show the live camera image beside it.
- Detect each trained color object in the live view.
- Compare the detected color order against the trained order.
- Display real-time status for each color object.
- Pass the step only when the required color condition is met.
The operator may see statuses such as:
• NOT DETECTED — the expected object was not found.
• DETECTED – CANNOT DETERMINE ORDER — one or more colors are missing, so the system cannot confirm the full order yet.
• OUT OF ORDER — colors were detected, but not in the expected order.
• OVERLAP — overlap checking is enabled and colors overlap beyond the allowed threshold.
• DETECTED IN ORDER — the color is detected in the expected order.
Color Check Tips
Use consistent lighting
Color Check depends on color appearance and similarity. Lighting changes can make the same object appear different. Use stable, repeatable lighting whenever possible.
Avoid shadows and glare
Reflections, glare, and strong shadows can affect color detection. Position lights and camera angle to reduce these effects.
Zoom in and crop the image tightly to the assembly
Make sure the color objects are large enough in the camera view for reliable detection. Whenever possible, crop out objects that are not included in the step, especially when these are of similar color to objects being verified.
Keep the background as clean as possible
A cluttered or similarly colored background can make color detection less reliable.
Select the actual color area
When training, select only the visible color object you want verified. Avoid including background, shadows, or neighboring colors in the mask.
Use clear labels
Use labels that operators and supervisors can understand, such as “Red Wire,” “Blue Clip,” or “Green Indicator.”
Set tolerance carefully
Start with the default tolerance and use TEST to preview the result. Increase tolerance if the correct color is not detected reliably. Decrease tolerance if the system detects too much surrounding area or similar colors.
Train from the expected production condition
Capture the reference image with the colors in the same location, lighting, camera zoom, and assembly condition operators will use during production.
Color Check Expert Mode
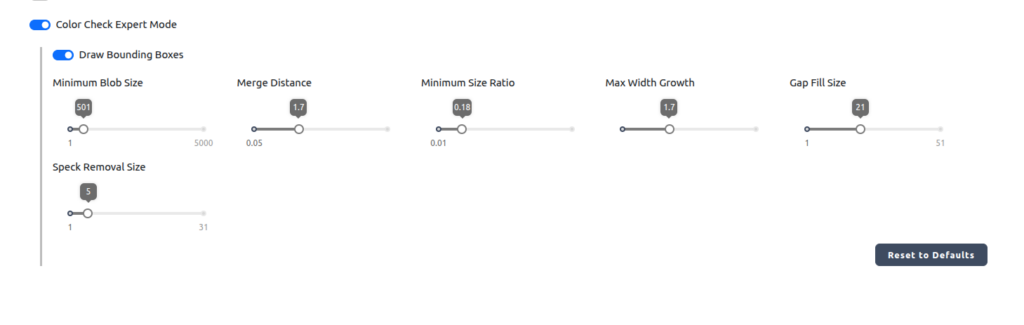
Color Check Expert Mode was implemented to give users maximum visibility and control over the performance of Color Check steps. Expert Mode provides the following settings:
- Draw Bounding Boxes – Draws bounding boxes around live detections made during coaching. This allows users to see exactly what detections are being made. If live detection bounding boxes are not completely encompassing an object, this may indicate that color variance needs to be tuned, or lighting conditions need to be improved.
- Minimum Blob Size – The smallest patch of color that counts as a real detection. Raise it to ignore small specks; lower it to catch smaller marks.
- Merge Distance – How close two same-color patches must be before they’re treated as one. Higher joins patches that are farther apart; lower keeps them separate.
- Minimum Size Ratio – Keeps only patches that are at least this fraction of the largest patch of the same color. Higher drops smaller leftover pieces; lower keeps more of them.
- Max Width Growth – Stops two side-by-side items of the same color (like two parallel wires) from being merged into one. Lower keeps close items separate; higher lets them combine.
- Gap Fill Size – Fills small holes and gaps inside a detected color area so it reads as one solid shape. Higher fills larger gaps.
- Speck Removal Size – Cleans up tiny stray dots of color that aren’t part of a real detection. Higher removes larger specks.