Fine-Tuning AI Performance
When training your assembly steps in Rapta’s AI platform, you have access to powerful controls that let you optimize how the AI recognizes and validates each step. Two key settings—Min Prediction Threshold and Prediction Smoothing—give you the flexibility to balance speed and accuracy for your specific manufacturing environment.
Min Prediction Threshold: Setting Your Confidence Bar
The Min Prediction Threshold determines how confident the AI needs to be before accepting that an operator has correctly completed a step. Think of it as setting the bar for quality control.
How it works:
• Range: 0.0 to 1.0 (0% to 100% confidence)
• Default: 0.8 (80% confidence)
• Adjustable in increments of 0.05
When to adjust:
• Lower the threshold (e.g., 0.5-0.7) when you need faster step progression or when working with steps that have natural variation
• Raise the threshold (e.g., 0.85-0.95) for critical quality steps where you need maximum certainty before advancing
This setting is particularly valuable for assemblies where certain steps require stricter validation than others. You can customize each step independently to match your quality requirements.
Prediction Smoothing: Reducing False Positives
Prediction Smoothing controls how many consecutive video frames the AI analyzes before confirming a step is complete. This feature prevents the system from reacting to momentary anomalies or brief movements that might otherwise trigger false positives.
How it works:
• Range: 5 to 20 frames
• Default: 6 frames
• Higher values = more smoothing, slower response
• Lower values = less smoothing, faster response
Benefits:
• Reduces noise: Filters out single-frame anomalies that could cause incorrect step detection
• Improves accuracy: Ensures the AI sees a consistent pattern before advancing
• Optimizes speed: Lower settings allow faster-paced assemblies to move quickly through steps
According to Rapta’s platform design, Prediction Smoothing “improves the speed of predictions” by intelligently buffering recent frames to make more reliable decisions.
Accessing these Controls
1. Navigate to your assembly
2. Select the step you want to configure
3. Click Edit Step
4. Locate the Min Prediction Threshold and Prediction Smoothing sliders on the page
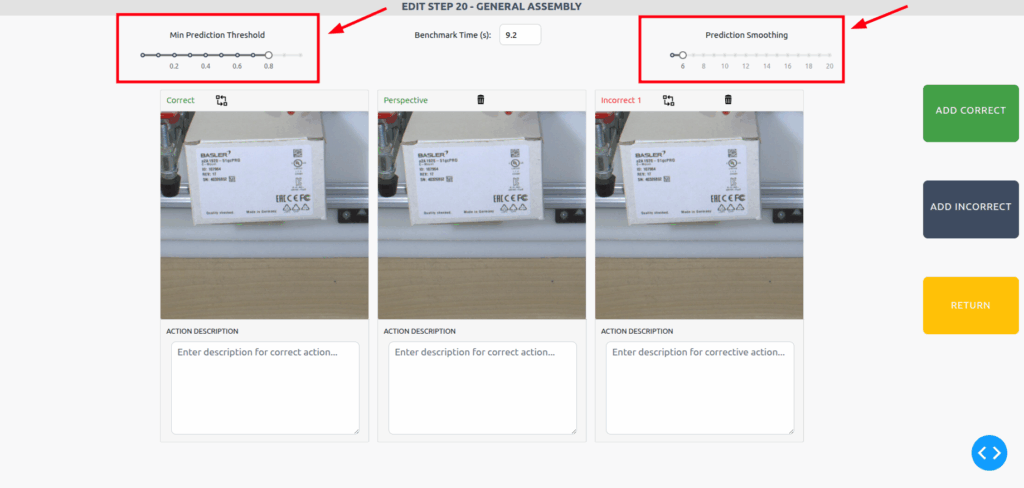
You’ll see both sliders displayed prominently, allowing you to adjust them independently for each step in your assembly process.
Enabling Prediction Smoothing
Prediction Smoothing is a system-wide feature that must be enabled before you can adjust it for individual steps:
1. Navigate to Setup → Live Configuration Tab
2. Toggle “Enable Prediction Smoothing” to ON
3. Set your default smoothing value (5-20 frames)
4. Individual step settings will now be adjustable when editing assembly steps
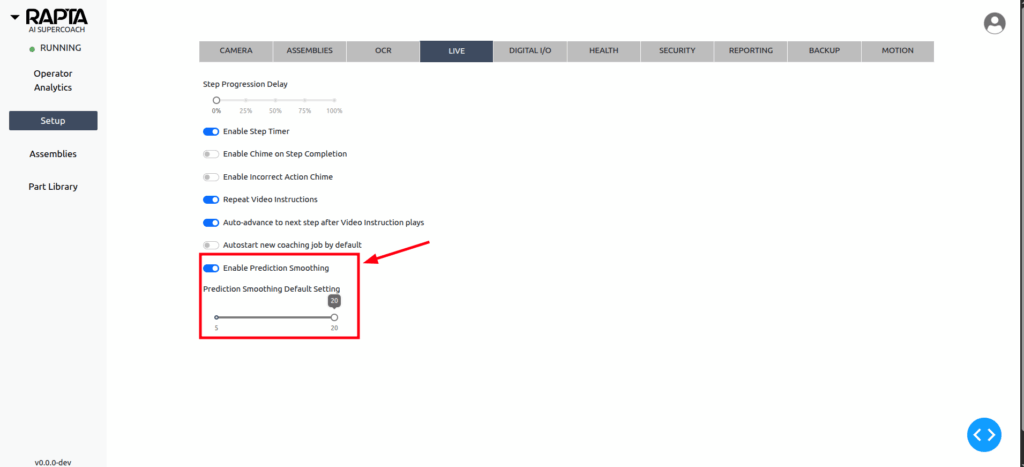
Why is it disabled by default?
This prevents accidental changes to prediction behavior without administrator awareness. Once enabled globally, you can fine-tune the setting for each assembly step based on your specific needs.
Best Practices
For fast manual assembly lines:
• Use lower prediction smoothing values (5-8 frames) to keep pace with rapid operations
• Adjust Min Prediction Threshold based on step criticality
For precision assembly work:
• Use higher prediction smoothing values (12-20 frames) to ensure consistent detection
• Set higher Min Prediction Threshold (0.85+) for quality-critical steps
For mixed environments:
• Customize settings per step—use stricter controls for critical fastening operations and more lenient settings for preparatory steps
• Monitor your assembly analytics to identify steps that may benefit from threshold adjustments
Getting Started
These controls are available on the Edit Step page for all general assembly steps. Simply navigate to your assembly, select the step you want to optimize, and adjust the sliders to match your operational requirements.
Need help determining the right settings for your assembly? Contact your Customer Success Manager or reach out to support@rapta.ai for guidance tailored to your specific manufacturing environment.
Related Articles:
• Best Practices for Training AI Models