Part Verification and Part Library
Overview
The Part Verification assembly step enables the Rapta Supercoach to automatically detect and verify specific parts and their quantities in your assembly process. This feature is ideal for validating kits, ensuring correct part quantities before assembly, and catching missing or incorrect components early in your production workflow.
Additionally, the Part Library serves as the foundation for defect detection and foreign object debris (FOD) detection in Scan Region actions, allowing you to train the system to identify issues during automated inspection.
Version Support: Supported from V8.3.0.
How It Works
Part Verification uses intelligent object detection to identify parts in the camera view. Before creating Part Verification steps or Scan Region actions, you must first add your parts, defects, or FOD to the Part Library, which serves as the system’s reference database. Once trained, the Rapta Supercoach can detect these items during live assembly operations and verify that the correct parts and quantities are present, or identify defects and FOD during inspection.
Part Library Setup
Adding Parts to the Library
The Part Library is where you define all parts that will be used in Part Verification steps. You can add parts individually or import your existing parts lists to streamline the setup process.
Importing Parts Lists
Imported parts lists must be in CSV (comma-separated values) format and must have the following columns in this order: ID, Part Number, Description, Label
Headers on imported price list CSV files are optional.
Capturing Part Images
- Navigate to the Part Library in your Rapta Supercoach supervisor interface
- Click EDIT button on the part you want to add images to
- Click the ADD button in the Captured Images section of the Part Edit page
- Use the platform camera to capture an image of the part
- Click on the object in the captured image to define it to the system
- Review the object detection result to ensure the part is correctly covered
- Click CONTINUE to store the image with the part
Repeat this process to add multiple images for each part, capturing different angles and orientations as needed.
Best Practices for Part Images:
- Capture 6 – 10 images of each part from various angles for optimal detection performance
- Zoom camera until part fills approximately 30% of the screen without being cropped
- Include images showing the orientation in which the part will typically appear during verification
- Use the Rapta Supercoach platform cameras to capture part images directly
- Ensure good lighting conditions when capturing part images – refer to Correct Lighting Setup for guidance
Adding Annotations for Defect and FOD Detection
For Scan Region actions that detect defects or FOD, you can add multiple annotations to captured images to train the system on various detection targets within a single image:
- After capturing an image and storing it with the part, click the Plus icon on the captured image card
- The annotation interface will open
- Click and drag to draw bounding boxes around defects, FOD, or other detection targets in the image
- Label each annotation with the appropriate item name (defect type, FOD category, or part identifier)
- Add multiple annotations to the same image as needed
- Save your annotations
This annotation feature allows you to efficiently train the detection model by marking multiple items of interest within each captured image, improving the system’s ability to identify defects and FOD during automated inspection.
Training the Object Detection Model
Once all necessary parts, defects, and FOD have been added to the Part Library with their associated images and annotations:
- Click the TRAIN button in the Part Library interface
- The system will begin training an object detection model
- Training time varies based on the number of parts in your library – this process may take up to several hours
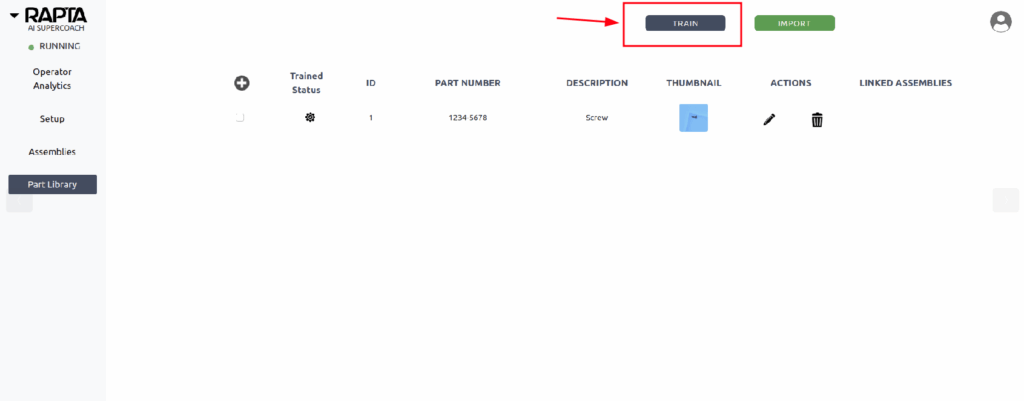
**Important:** You must complete model training before creating Part Verification steps or Scan Region actions in your assemblies.
Creating a Part Verification Step
- Choose Part Verification as the assembly step action type
- Position your camera to capture the area where parts should be verified (e.g., a parts kit, component tray, or staging area)
- Adjust zoom to ensure all expected parts are clearly visible in the frame
- Capture the image with the correct parts present
Reviewing Detected Parts
After capturing the image, the Rapta Supercoach will process and detect objects in the scene. The system presents the results in a table showing:
- Part numbers of detected objects
- Quantity of each part detected
Editing the Parts Table:
- Add parts that should be detected but weren’t automatically identified
- Remove false detections or parts that shouldn’t be included in verification
- Verify part numbers are correct
- Use the RECAPTURE button to recapture the image used in part detection
Once you are satisfied with the parts configuration, click YES to finalize the step.
Part Verification Tips
- Consistent positioning: Arrange parts in a consistent layout during verification to improve detection accuracy
- Adequate spacing: Ensure parts are not overlapping or obscuring each other when possible
- Camera angle: Maintain the same camera angle during live operations as when the step was created
- Lighting consistency: Use consistent lighting conditions – variations in lighting can affect detection performance (refer to Correct Lighting Setup for guidance)
- Background: Use a clean, uncluttered background to help the system distinguish parts clearly
Live Assembly Verification
\When running the assembly during production, the Part Verification step will:
- Capture an image of the verification area
- Detect all parts present in the scene
- Compare detected parts against the expected parts and quantities defined in the step
- Pass the step if the correct number and type of parts are detected
- Fail the step if parts are missing, incorrect, or present in wrong quantities
The system provides real-time feedback to operators, highlighting any discrepancies immediately.
Troubleshooting
Parts not being detected:
- Verify the part has sufficient images in the Part Library
- Ensure lighting conditions match those used during part image capture
- Check that parts are not obscured or overlapping
- Confirm the object detection model training has completed successfully
False detections:
- Review and clean the background of your verification area
- Add more training images to the Part Library showing the correct part orientation
- Retrain the object detection model after adding new images
Inconsistent detection results:
- Maintain consistent camera positioning and zoom levels
- Follow Correct Lighting Setup recommendations
- Ensure parts are arranged similarly to how they appeared during step creation
Defects or FOD not being detected (Scan Region actions):
- Verify you have added annotations to captured images using the Plus icon feature
- Ensure sufficient annotated training images exist for each detection target (6-10 recommended)
- Check that annotations accurately cover the defects or FOD in the training images
- Retrain the object detection model after adding new annotations
- Verify camera position, zoom, and lighting provide adequate view during inspection