Rapta SuperPod and PrecisionPod
Rapta SuperPod and PrecisionPod
Overview
Rapta SuperPod and PrecisionPod are intelligent camera positioning systems that dramatically expand inspection capabilities by providing automated, precise camera movement during assembly and quality inspection workflows. Unlike fixed camera arrays, these positioning systems enable your camera to move to optimal angles and positions for each step, reducing the number of cameras needed while increasing inspection flexibility and coverage.
Version Support: Supported from V8.4.0 and later.
System Variants
Rapta SuperPod
The SuperPod is designed for large-scale assembly operations requiring extensive camera positioning range. Available configurations include:
- 3-axis, 6-foot system for medium-range applications
- 4-axis, 10-foot system for extended reach requirements
Ideal for large assemblies, panel wiring, and manufacturing processes requiring wide-area inspection coverage.
Rapta PrecisionPod
The PrecisionPod is optimized for detailed inspection and quality control applications requiring high-precision camera positioning. This 3-axis precision inspection station excels at close-range inspection, component verification, and defect detection where exact camera positioning is critical.
Key Benefits
Enhanced Inspection Flexibility – Capture inspection angles that would be impossible or impractical with fixed cameras, enabling comprehensive quality checks from any perspective.
Optimized Workflows – Automatically move the camera to the perfect position for each assembly step, eliminating manual repositioning and reducing cycle time.
Reduced Hardware Costs – Position a single camera at multiple angles instead of deploying an array of fixed cameras, significantly lowering deployment and maintenance costs.
Scalable Quality Control – Integrate with Scan Region actions to automate complex inspection patterns for defect detection and foreign object detection.
How It Works
During assembly creation, users define the exact camera position needed for each step. The positioning system then automatically moves to those positions during live assembly execution, ensuring operators and AI inspection systems always have the optimal view.
Axis of Motion
Both SuperPod and PrecisionPod support multi-axis movement:
- Linear axes (X/Y) – Horizontal and vertical rail movement for broad coverage
- Rotational axes (Pan/Tilt) – Gimbal-based camera angle adjustment for precise perspective control
Systems support 1-4 axes of motion depending on configuration and application requirements.
Setup and Configuration
Initial Setup
Enable Motion Control
- Navigate to the Setup page via the main menu
- Locate the Motion Control section
- Toggle “Enable Motion Control” to ON
- Confirm positioning device IP address and use Test Connection to confirm connectivity
- Your motion controls will now appear in the camera UI during assembly creation
Device Configuration
- Device Type: Automatically set based on your license (SuperPod or PrecisionPod)
- Device Name: Customize the display name (defaults to “SuperPod” or “Precision Inspection”)
- IP Address: Static IP set in the device (default: 192.168.86.100)
Test Connection Click the “Test Connection” button to verify successful communication with your positioning system. This diagnostic tool helps troubleshoot configuration or hardware connection issues during setup or maintenance.
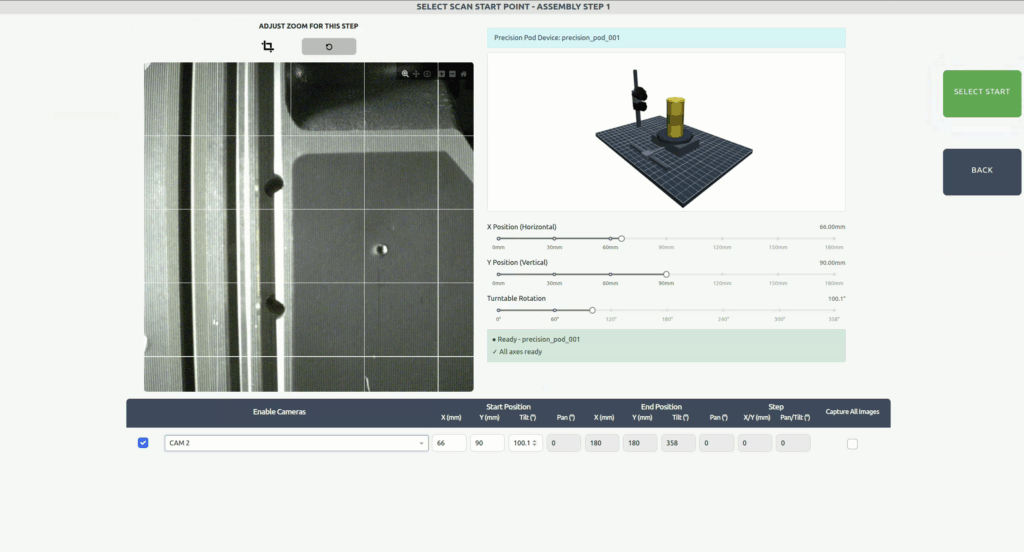
Camera Positioning During Assembly Creation
When creating or editing assembly steps with motion control enabled:
- Visual Positioning – Click and drag the camera cone directly on the workbench view to adjust pan and tilt angles organically
- Rail Control – Grab the camera icon and slide it along the rail to adjust linear position
- Precision Adjustment – Use the slider controls for fine-tuned positioning on any axis
The system automatically saves each step’s camera position and reproduces it precisely during live assembly execution.
Safety Features
SuperPod and PrecisionPod include integrated safety features including door interlock detection and emergency stop capability. The system automatically pauses when safety conditions are not met and alerts operators through the Rapta UI.
Maintenance and Field Service
Reset Device Initiates a full reset of the positioning system, including homing all axes to their safe resting positions. Use this function after power interruptions or when the system requires re-initialization.
Disable Motors Enables safe field service and maintenance by disabling motor power. When pressed, the button changes to “Enable Motors” – clicking it again re-enables the motors and triggers the reset device routine to re-home all axes.
Integration with Assembly Actions
SuperPod and PrecisionPod work seamlessly with Rapta assembly actions:
- General Assembly – Position camera optimally for each assembly verification
- QA Inspection – Move to inspection angles for defect detection
- OCR Verification – Achieve precise positioning for reading text at any angle
- Scan Region – Execute automated scanning patterns for comprehensive inspection (Learn more about Scan Region actions)
Real-Time Monitoring The system provides continuous status feedback including position information, movement progress, and error notifications directly in the Rapta UI.
Troubleshooting
Connection Issues
- Verify the device is powered on and network cable is connected
- Use the “Test Connection” button to diagnose connectivity
- Confirm IP address matches device configuration (default: 192.168.86.100)
System Requires Homing If the system displays a homing error or position fault:
- Ensure all safety interlocks are satisfied (doors closed, emergency stop released)
- Click “Reset Device” to initiate the homing sequence
- Allow all axes to complete the homing process before resuming operations
Motors Not Responding
- Check if “Disable Motors” was activated – click “Enable Motors” to restore functionality
- Verify power supply to the positioning system
- Contact Rapta support if issues persist after reset
Best Practices
- Define positions during training – Take time to find optimal camera positions for each step to maximize inspection quality
- Test motion sequences – Use the preview function to verify camera movements before deploying to production
- Regular maintenance – Keep linear rails clean and verify smooth operation periodically
- Document custom positions – Note any specialized camera positions for future reference or troubleshooting
Related Articles
For additional support or questions about SuperPod and PrecisionPod systems, contact your Rapta support team.